Archive for July, 2010

Check If User Name Exists Using AJAX And C#


You could make sure the user name entered during the registration process of your website is unique before the submit button is clicked using AJAX and C#. To accomplish this create two aspx pages. The first (default.aspx in this example) is the registration page, and it contains a TextBox control with an onkeyup element that calls the updateOutput JavaScript function and a span tag to display the HTML returned by the XMLHttpRequest.send function. The second page (doajaxstuff.aspx) should only contain following tags:

  1. <%@ Page Language="C#" AutoEventWireup="true" CodeBehind="doajaxstuff.aspx.cs"
  2. Inherits="ManualAJAX.doajaxstuff" %>
  3. <asp:literal runat="server" id="literal1" />

The html, title and body tags should be removed because the page contents will be added to the default.aspx page, which already has these tags. The C# code that checks if the user name exists is in the Page_Load event of doajaxstuff.aspx. It gets the user name from the query string and displays the result in a Literal control. To keep the example simple I returned “User name exists” or “OK”, but this could be changed to return an img tag to show a red cross image or a green tick respectively.

string[] usernames = { "admin", "administrator", "user1","user2",
                     "guest1", "guest2"};
protected void Page_Load(object sender, EventArgs e)
{
    string newUsername = Request.QueryString["q"];  

    if(usernames.Contains(newUsername))
    {
        literal1.Text = "User name exists";
    }
    else
    {
        literal1.Text = "OK";
    }
}

The JavaScript code below does the AJAX work. The updateOutput function checks first if the TextBox is empty, and exits if true. Then it creates an object called xmlHttp which is an XMLHttpRequest object or an ActiveXObject, depending on the user’s browser. XMLHttpRequest is supported in browsers from Internet Explorer 6, Opera 7.60, Mozilla 1.0, Netscape 7, Safari 1.2 and Konqueror 3.2. If the user has Internet Explorer 5 an ActiveXObject will be created, which basically does the same job. If the xmlHttp object is created the variable url will be assigned a string containing the page to call plus the query string, which is the string entered by the user in usernameTextBox.

The onreadystatechange event handler is assigned the name of the function StateChanged. This event occurs five times: when the request is initialized, set up, sent, being processed and completed. You could check which stage the request is in using the readyState variable (0, 1, 2, 3 and 4 respectively.) The if statement checks for 4 which is set when the HTML is downloaded to xmlHttp.responseText. The if statement also makes sure that xmlHttp.status is 200, which means no error occurred. If both these conditions are true the contents of xmlHttp.responseText are displayed in the span tag.

The open method sets the parameters of the request and contains three parameters; the request method, the URL of the request and a Boolean parameter that specifies the request should be executed asynchronously or not. The first parameter could be “GET”, “POST”, “HEAD” or “PUT”. The second parameter is the relative or full URL of the page to request. And the third parameter should be true so the page could be called asynchronously.

The send method executes the request. Because the open method’s first parameter is “GET”, send’s parameter is null. If open’s first parameter was “POST” it would be a string containing the request parameters.

Code:

<head runat="server">
<title>Manual AJAX</title>
<script language="javascript" type="text/javascript">
var xmlHttp;
function updateOutput(inputString)
{
if(inputString.length == 0)
{
document.getElementById("output").innerHTML = "";
return;
}
try
{
if(window.XMLHttpRequest)
xmlHttp = new XMLHttpRequest();
else if (window.ActiveXObject)
xmlHttp = new ActiveXObject("Microsoft.XMLHTTP");
if(!xmlHttp || xmlHttp == null)
{
return;
}
var url="doajaxstuff.aspx?q=" + inputString;
xmlHttp.onreadystatechange=StateChanged;
xmlHttp.open("GET", url, true);
xmlHttp.send(null);
}
catch(e)
{
document.getElementById("output").innerHTML = "An error occured";
}
}
function StateChanged()
{
if((xmlHttp.readyState == 4) && (xmlHttp.status == 200))
{
document.getElementById("output").innerHTML = xmlHttp.responseText;
}
}
</script>
</head>
<body>
<form id="form1" runat="server">
<div>
Enter Username:
<asp:TextBox runat="server" ID="usernameTextBox"
onkeyup="updateOutput(this.value)" />
<span id="output"></span>
</div>
</form>
</body>
<head runat="server">     <title>Manual AJAX</title> <script language="javascript" type="text/javascript">         var xmlHttp; function updateOutput(inputString) {             if(inputString.length == 0)  {                 document.getElementById("output").innerHTML = "";   return;             } try  {                 if(window.XMLHttpRequest)       xmlHttp = new XMLHttpRequest();  else if (window.ActiveXObject)     xmlHttp = new ActiveXObject("Microsoft.XMLHTTP");             if(!xmlHttp || xmlHttp == null)  {                     return;                 } var url="doajaxstuff.aspx?q=" + inputString;                 xmlHttp.onreadystatechange=StateChanged;                 xmlHttp.open("GET", url, true);                 xmlHttp.send(null);             }             catch(e)             {                 document.getElementById("output").innerHTML = "An error occured";             }         } function StateChanged() {             if((xmlHttp.readyState == 4) && (xmlHttp.status == 200))  {                 document.getElementById("output").innerHTML = xmlHttp.responseText;             }         }     </script> </head> <body>     <form id="form1" runat="server">     <div>         Enter Username:         <asp:TextBox runat="server" ID="usernameTextBox" onkeyup="updateOutput(this.value)" />         <span id="output"></span>     </div>     </form> </body>

For this example the C# code in the doajaxstuff.aspx page searches an array containing the user names. This could be changed to search through the users in the aspnetdb database using the Membership.GetUser static function. I should also mention that the user can ignore the result of this validation check and submit a name that exists. To prevent this, the same validation should be done in the Submit button’s code.

Drag And Drop Files to a C# Application


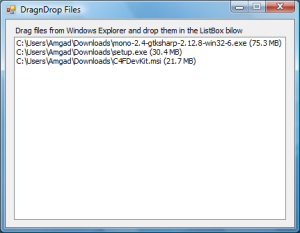
The .NET Framework makes it easy to detect objects dragged and/or dropped into a Windows Forms application using one or more of the drag-and-drop events available. In these events you could check if the object is a file.

To enable a control to be a target of a drag-and-drop operation set its AllowDrop property to true and use one or more of the following events:

  • DragEnter: Occurs when the user drags an object into the control’s area, and has not released the mouse button yet.
  • DragOver: Occurs when the object is being dragged in the control’s area.
  • DragDrop: Occurs when the user lets go of the dragged object in the control’s area.
  • DragLeave: Occurs if the object dragged into the control is dragged out again without the user releasing the mouse button, or the user canceled the operation by pressing the Escape key.
  • GiveFeedback: Occurs when the drag-and-drop operation starts and is used to modify the visual feedback of the operation.
  • QueryContinueDrag: Occurs when the keyboard or mouse state is changed during the drag-and-drop operation.

To process one or more files dragged and dropped into a control two events are needed, DragEnter and DragDrop. The if statement in DragEnter checks what is dragged in is of type DataFormats.FileDrop, the Windows file drop format, or not. If true the drag operation is allowed. The DragDrop event retrieves the list of files dropped using the GetData method and casts them to an array of strings. Each element of the array will contain a full path of one of the files dropped.

private void filesListBox_DragEnter(object sender, DragEventArgs e)
{
    if (e.Data.GetDataPresent(DataFormats.FileDrop, false) == true)
    {
        e.Effect = DragDropEffects.All;
    }
}  

private void filesListBox_DragDrop(object sender, DragEventArgs e)
{
    string[] files = (string[])e.Data.GetData(DataFormats.FileDrop);  

    foreach (string file in files)
    {
        filesListBox.Items.Add(file);
    }
}

C# – Autocomplete Textbox


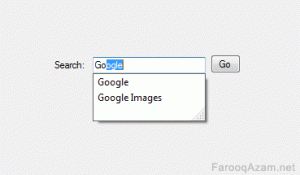
There are times when you’ll need an autocomplete textbox. Autocomplete textbox makes the user’s life easier. It shows suggestions as the user types. In case of a web browser, if you type “goo” it will automatically show all the suggestions starting with or containing “goo” like “Google, Goofy” etc. Enough talk! Lets get on with it.

Fortunately, textbox has a built-in autocomplete feature! We don’t have to do any coding.

You can either set it up from the Designer (if you are using Visual Studio or #Develop) or do it via code. It is simple both ways. Lets do it!

Setting up AutoComplete

For setting up autocomplete you’ll have to use three properties of the TextBox class — AutoCompleteSource, AutoCompleteCustomSource and AutoCompleteMode. Here’s an explanation of these properties:

AutoCompleteSource is the source of the suggestions. You can assign it CustomSource if you want to use custom suggestions or use other auto sources like FileSystem, HistoryList etc. Below are all the available sources:

FileSystem: This will show suggestions from the file system i.e files stored on the computer. Like if you write “C:\” it’ll show all the files stored on C: drive.
FileSystemDirectories: This is same as FileSystem but it shows directory names instead of file names.
HistoryList: This will show URLs from Internet Explorer’s history.
RecentlyUsedList: A list of recently used applications, folders, and URLs (from internet explorer).
AllUrl: This specifies an equivalent of HistoryList and RecentlyUsedList as the source.
AllSystemSources: Specifies an equivalent of AllUrl and FileSystem as the source.
AutoCompleteModes are of 3 types. Suggest, Append and SuggestAppend:

Suggest will show suggestions in a drop-down as the user types.
Append will auto complete as you type. Like if you write “Goo” it’ll automatically make it “Google”.
SuggestAppend will do both Suggest/Append.
AutoCompleteCustomSource is collection of custom suggestions. It will be used when you assign “CustomSource” as “AutoCompleteSource”.

Okay enough explanations. Lets make an autocomplete textbox now.

Using Designer:
If you are using the Designer, then all you have to do is to select your TextBox and change those three properties (explained above). For instance, if you want to use custom suggestions then use “CustomSource” and add the custom suggestions to “AutoCompleteCustomSource” (don’t forget to set up AutoCompleteMode). Debug your project and see! Its that easy . Don’t forget that you can also use all the other sources like FileSystem, HistoryList etc.

The Code:

// List of custom suggestions
string[] suggestions = new string[] {
"Google",
"Google Images",
"Yahoo",
"Youtube"
};

// Use the AutoCompleteMode that suits you.
textBox1.AutoCompleteMode = AutoCompleteMode.Suggest;

// Since we are using custom suggestions you
// should use this source.
// Use the other non-custom sources if you
// don't want to use custom suggestions.
textBox1.AutoCompleteSource = AutoCompleteSource.CustomSource;

// And finally add the above suggestions to the CustomSource
textBox1.AutoCompleteCustomSource.AddRange(suggestions);

Crop Image – C#


For cropping an image in C#  we can use the Graphics class. We’ll use a method which will take 2 parameters, a source image and a rectangle of the section that should be cropped.  Let’s code!

The Code

public Bitmap CropImage(Bitmap source, Rectangle section)
{

 // An empty bitmap which will hold the cropped image
 Bitmap bmp = new Bitmap(section.Width, section.Height);

 Graphics g = Graphics.FromImage(bmp);

 // Draw the given area (section) of the source image
 // at location 0,0 on the empty bitmap (bmp)
 g.DrawImage(source, 0, 0, section, GraphicsUnit.Pixel);

 return bmp;
}

// Example use:

Bitmap source = new Bitmap(@"C:\tulips.jpg");
Rectangle section = new Rectangle(new Point(12, 50), new Size(150, 150));

Bitmap CroppedImage = CropImage(source, section);

Explanation
The above code will work perfectly but it seems confusing, doesn’t it? You might have been wondering how it works. Well…

We first make an empty bitmap of the same width/height as the section rectangle. This bitmap will hold the cropped image. We use the section rectangle’s width/height because it determines the size of the cropped image. Then we use the Graphics class’s DrawImage() method (function) for the cropping. It draws the given area (section) of the source image on the empty bitmap and that’s it. The empty bitmap now holds the cropped image.

Silverlight 4 debugging and Firefox 3.6.4+


I’ve been stuck on this for a few days.

At the moment, Firefox 3.6.4 (and newer) have a new functionality called ‘Crash protection’, which is quite nice.

For customers.

It now runs the plugins in a separate process called ‘plugin-container.exe’ (look in your task manager).

But for developers it’s quite the hassle, since Visual Studio attaches itself to Firefox but NOT to this process. So no more Silverlight debugging for you!

Luckily there are two options for you!

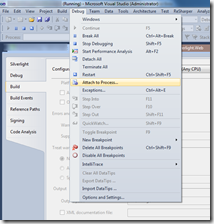
The first option is the most straight forward, but has to be done each time. Use Visual Studio to attach itself to plugin-container.exe, refresh the website, and BAM, you’re up and running!

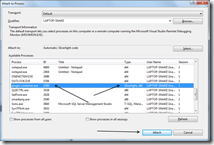
On the next screen click ‘plugin-container.exe’. There might be 2, if so, select the one with ‘Silverlight’ in the ‘Type’ column:

And hit ‘Attach’.

While this solution is adequate for when you need to debug it one time at a day, but for me, I only debug in Firefox, and when necessary I use Internet Explorer. For that you can go to your ‘about:config’ in Firefox, disable ‘dom.ipc.plugins.enabled.npctrl.dll’ (set it to false).

Regular Expressions in C# – Practical Usage


This is the second post in the C# regular expression series and it follows up on “Regular Expressions in C# – The Basics” which explained the theory behind Regular expressions in C#. In this post we look at how to make practical use of regular expressions in our C# code.

This post touches on four major regular expression subjects:

  • String Comparison – does a string contain a particular sub-string?
  • Splitting a string into segments – we will take an IPv4 address and retrieve its dotted components
  • Replacement – modifying an input string
  • Stricter input validation – how to harden your expressions

String Comparison – finding valid HTML tags

One of the essential functions of expressions are their ability to find if a string is contained inside another one. The RegEx.Matches method tests if a given string matches the pattern.

We start with a simple example: finding out where the letter “a” is mentioned in a sentence:

string Input = "apples make for great party accessories";
Regex FindA = new Regex("a");

foreach(Match Tag in FindA.Matches(Input))
{
    Console.WriteLine("Found 'a' at {0}",Tag.Index);
}

That was almost too easy. Regular expressions really shine if you don’t know exactly what you are looking for but you can describe it. In the following example we will look for all valid HTML tags in an input string.

What is a valid HTML tag? <code>, </code>, <b>,<img src=””>, </br> are all valid HTML tags.

Regex HTMLTag = new Regex(@”(<\/?[^>]+>)”);

To break this down:

  1. All valid HTML tags start with a “<”
  2. They might or not have a forward slash (we need to escape the forward slash) \/?
  3. There is at least one or more characters which are not “>”
  4. The tag ends with a “>”

The following code example searches for all valid HTML tags in the input string:

using System;
using System.Text.RegularExpressions;

namespace RegularExpression
{
    class MainClass
    {
        public static void Main(string[] args)
        {
            Regex HTMLTag = new Regex(@"(<\/?[^>]+>)");

            string Input = "<b><i><a href='http://apple.com'>Ipod News</a></b></i>";

            foreach(Match Tag in HTMLTag.Matches(Input))
            {
                Console.WriteLine("Found {0}",Tag.Value);
            }
        }
    }
}

Resulting in:

Found <b>
Found <i>
Found <a href=’http://apple.com’>
Found </a>
Found </b>
Found </i>

Splitting a string into parts

Parentheses () not only allow you to group your expressions into parts they allow you to split a single string into multiple segments which we can inspect individually. To demonstrate we will use a regular expression to split an IPv4 address into its components.

A decimal TCP/IP address looks like XXX.XXX.XXX.XXX with X being a decimal number. Each column has at least 1 digit, and a maximum of 3. So a single column can be described as “(\d{1-3})“. There are four columns, each seperated by a dot. The dot (.) has a special meaning in regex so we need to escape it. (\.)

The Regex.Match method returns a new Match instance. We can now testMatch.Success to see if the input string matched the TCP/IP address pattern. Through the Match.Groups property can we then extract each of the four IP address columns.The zero entry in the Groups property is alway the complete match, in this case “10.0.0.6″. The [1] entry contains the first groups contents, [2] the second etc.

string IPMatchExp = @"(\d{1,3})\.(\d{1,3})\.(\d{1,3})\.(\d{1,3})";
Match theMatch  = Regex.Match("10.0.0.6",IPMatchExp);
if (theMatch.Success)
{
    Console.WriteLine("{0}.{1}.{2}.{3}",theMatch.Groups[1].Value,
                                          theMatch.Groups[2].Value,
                                          theMatch.Groups[3].Value,
                                          theMatch.Groups[4].Value);
}

String Replacement

Often it is useful to manipulate a string, by replacing the matched pattern with something new. The RegEx.Replace method allows us to specify a pattern to look for and a replacement string.

The following example matches the last character and space following each word and replaces it with “b_”.

Regex Replacer = new Regex(@"\w "); // Single [a-zA-Z] followed by a space
string Input  = "ax bx sax dam pom";
string Output = Replacer.Replace(Input,"b_"); // Replace all items found with a b and underscore
Console.WriteLine(Output);

Substitution Patterns

What to do if you would like to flip parts of a string? C# offers several substitution patterns for this. Substitution patterns can only be used in a replacement string, and are used in combination with grouping.

They are useful if you would like to format the results of the match. A common task is to flip two words around. In the below example we flip the name “Molly Malone” into “Malone Molly”:

Regex Replacer = new Regex(@"(\w*) (\w*)");
string Input  = "Molly Mallone";
string Output = Replacer.Replace(Input,"$2 $1");
Console.WriteLine(Output);

The regular expression is defined as two groups of words (\w*) separated by a space. Each group can be referred to with a substitution pattern. $1 refers to the first group, $2 to the second (and if we had defined more $3 would be the third etc).

Input validation – we have to be more strict

Often we need to check if the data inputed or read from a file matches a definition so that we know its valid. But for this to work we need to ensure that our expressions only match a valid input. Many expressions of convenience are defined too loose. If we are to use them for input validation we need to harden them.

The pattern we used in an earlier example neatly broke down a valid IP address. But it wasn’t very strict and there are many combinations that would have matched that aren’t valid IP addresses. 999.999.999.999 is not a valid IPv4 address but it would have matched our pattern (@”(\d{1,3})\.(\d{1,3})\.(\d{1,3})\.(\d{1,3})”). So we couldn’t have used it for testing for a valid IP address.

So what is a valid match? We need to define this first.

A valid IP address range is from 0.0.0.0 to 255.255.255.255 (with each column being represented by a byte).

At this point there are two things we can do: we can validate the results returned by our expressions with a few additional lines of C# code or we modifying our regular expression to become stricter. As this post is about regular expressions we will modify our expression to match only valid IP addresses.

How do we define valid ? 0,9,10,19,100,199,200,249,255 are all valid inputs for each column. 300 isn’t valid, and neither is 299. To keep things simple, we don’t allow 09 as a valid input.

  • Single digit: 0 – 9 :   [0-9]
  • Double digit: 10 – 99: [1-9][0-9]
  • Triple digit 1:  100 – 199:  1[0-9]{2}
  • Triple digit 2: and 200 – 249:  2[0-4][0-9]
  • Triple digit 3: 250 – 255 25[0-5]

The single ([0-9])and double digit ([1-9][0-9]) combinations can be combined into:[1-9]?[0-9]. (Read as: The first 1-9 is optional, occurs 0 or 1 time)

So a single column can be defined as: (([1-9]?[0-9]|1[0-9]{2}|2[0-4][0-9]|25[0-5])\.) Note the “.” at the end.

On the final column we do not need a “dot”. We can save some space by repeating the first expression three times, but we need to write out the fourth in full. Thus our expressions becomes: ([1-9]?[0-9]|1[0-9]{2}|2[0-4][0-9]|25[0-5])\.{3}([1-9]?[0-9]|1[0-9]{2}|2[0-4][0-9]|25[0-5])

Not exactly easy to read, but lets test to see if it works as expected. The following example program tries all column combinations from 0-999.

using System;
using System.Text.RegularExpressions;

namespace RegularExpression
{
    class MainClass
    {
        public static void Main(string[] args)
        {
            string IPTestExp = @"(([1-9]?[0-9]|1[0-9]{2}|2[0-4][0-9]|255[0-5])\.){3}([1-9]?[0-9]|1[0-9]{2}|2[0-4][0-9]|25[0-5])";

            for (int Lp = 0; Lp < 999; Lp++)
            {
                string IPAddress = String.Format("{0}.{0}.{0}.{0}",Lp);

                if (Regex.Match(IPAddress,IPTestExp).Success)
                    Console.WriteLine("{0} is valid",IPAddress);
                else
                {
                    Console.WriteLine("{0} is invalid",IPAddress);
                    break;
                }
            }
          }
    }
}

For brevity the program ends at the first invalid combination. If we had let it run it would have shown 256-999 as invalid.

0.0.0.0 is valid
1.1.1.1 is valid
2.2.2.2 is valid

254.254.254.254 is valid
255.255.255.255 is valid
256.256.256.256 is invalid

This took a bit of work but we now have a single line test to see if a string is a valid IPv4 address.

C# guidelines that improve your code quality


I am inspired to better myself after reading Dennis Doomen’s freshly released coding guidelines for C# 3.0 . He provides a very nice PDF document that puts the dot to many common C# coding “confusions”. It addresses how to consistently name your variables, namespaces, classes and assemblies. He specifies when to declare a variable as static, as readonly and when to seal a class among others.

Another topic he pushes is code readability and ensuring that all code statements are as clear as possible.

You will often have your own way of doing things. A shared coding guideline is a good way to ensure that each member of your team is writing code styled as similar as possible.

If your company is looking at adopting a coding guideline for its C# development this would be a very good place to start.

At 32 pages it might seem a little long at first but it reads quickly and most topics should already be familiar if you do a lot of coding. Its companion quick reference guide neatly puts most key items onto a single page and makes for a great handout.

Loop3D, a new Silverlight 3D Behavior


Loop3D is a a Silverlight Design Interaction Pattern for 3D Interaction – In this case the effect/behavior provided is a3D Loop – a continuous – animation  on the three Axis, X, Y, Z which enables us to turn an element on a certain speed and easing over a concrete axis.

It is inspired trying to implement a planet and its satellites movement which turn around the planet at different speeds and angles. Anyway it can be used to whatever effect you consider, a halo system, etc..

It has been designed to be used together with the other 3D Behaviors, that have been published at the Expression Gallery, including this one:

You can see how it helps implement different effects at the Expression gallery.

You can also check how this and the other mentioned effects look when used together in a consistent way here: http://www.bcndev.net

I’d like to see or hear if you do like this behavior(s) and if you have used them in any design/implementation or whatever you might have done with them :)

Also, if you like this behavior it would be appreciated if you give me some stars at the expression gallery. My thanks!

WPF Series: Adorners, Commands and Logical Tree


Today I’m going to tell you a WPF story. But before I start to dig deeper let me first introduce you the main characters in this post. Here they are:
Adorner – adorners are simple UIElement decorators. Suppose that you have a RichTextBox and you want to place a comment box over it, so that users can comment on the text in the box. This can be archived with adorners. Actually the WPF framework uses adorners internally for exactly the same purpose when you edit and annotate FlowDocument in a DocumentViewer. This is the reason why adorners are in System.Windows.Documents namespace.
Command – commands are UI flavored implementation of the command pattern in WPF. You can read about them here.
Logical Tree – There are two control trees in WPF. One is the visual one, the other is the logical one. Imagine a Button for example. The button as logical entity act as a single control, you can click on it etc. However the visual representation of the button contains different UIElements – borders, TextBlock, etc. This means that WPF should maintain two separate control trees, one for the behavior elements – logical tree and one for the visual representation – visual tree. More info here.

There are a bunch of WPF adorners samples out there (including the SDK ones as well). But as usual when you try to create something more complex the standard samples break down. For example let say that we want to achieve something like the mini toolbar in Word 2007:

Let’s start our quest with a TextBox that look like this:

and you want to put a simple button next to it that will let say will open a hyperlink that is somehow related to the TextBox. You could easily achieve this with adorners and end up with something which look like this:

How to do this? You could create something like TextBoxAdorner that will derive from Adorner and will look like this:

public class TextBoxAdorner : Adorner
{
    private readonly UIElement adorningElement;

    public TextBoxAdorner(TextBox textBox, UIElement adorningElement ) : base( textBox )
    {
        this.adorningElement = adorningElement;

        if (adorningElement != null)
        {
            AddVisualChild(adorningElement);
        }
    }

    protected override int VisualChildrenCount
    {
        get { return adorningElement == null ? 0 : 1; }
    }

    protected override Size ArrangeOverride(Size finalSize)
    {
        if (adorningElement != null)
        {
            Point adorningPoint = new Point();

            //position at the end of the text box
            adorningPoint.X = ((TextBox)AdornedElement).ActualWidth;

            //position above the text box
            adorningPoint.Y -= adorningElement.DesiredSize.Height;

            adorningElement.Arrange( new Rect( adorningPoint, adorningElement.DesiredSize ) );
        }
        return finalSize;
    }

    protected override Visual GetVisualChild(int index)
    {
        if (index == 0 && adorningElement != null)
        {
            return adorningElement;
        }
        return base.GetVisualChild(index);
    }
}

Note that we call AddVisualChild() method so that the element that is passed to the constructor will be visible. It is also necessary VisualChildrenCount to return count of 1 and GetVisualChild() to return the UIElementthat is added to the visual tree – in our case this is the adorningElement.

So far so good. Now imagine that the button that is added as adorner did not have a click handler, but have a command set. Let’s name the command – “NavigateToLink”. The command handler is added to TextBox‘s input bindings, because the TextBox itself “knows” how to execute “NavigateToLink” command. (The sample is with TextBox, but you could imagine have your own custom control that have that logic in it). But what happens when we do this:

As you can see the button is disabled, because the command infrastructure in WPF did not manage to find a handler for our “NavigateToLink” command. This causes the Button to become disabled. Now what?

If you refer to the command readings in the links that were in the beginning of the post you will find our that the command mechanism in WPF uses the logical tree of controls to find handlers for particular commands. This bring us to point where we added the Button to visual tree. In our case we will have to add it as a logical child of the TextBox as well. This will automatically add it the logical tree of controls and the command handler will be correctly resolved and the Button enabled. Here is the new constructor of TextBoxAdornerclass:

public TextBoxAdorner(TextBox textBox, UIElement adorningElement ) : base( textBox )
{
    this.adorningElement = adorningElement;

    if (adorningElement != null)
    {
        AddVisualChild(adorningElement);
        textBox.AddLogicalChild( adorningElement );
    }
}

Here comes the other problem. For encapsulation reasons the AddLogicalChild() method ofFrameworkElement is marked as protected internal and can not be called as we call it in the snippet above. One way to workaround this is to derive from TextBox and make the method internal for your assembly. The other way is to use reflection and call the method. You can even create an extension method that will be available for all FrameworkElements. To make it even more extreme you can use expression trees to cache the method call and optimize the reflection. Here is the code:

internal static class FrameworkElementExtensions
{
    private static readonly Action AddLogicalChildMethod = CreateAddLogicalChildMethod();

    private static Action CreateAddLogicalChildMethod()
    {
        ParameterExpression instance = Expression.Parameter( typeof ( FrameworkElement ), "element" );
        ParameterExpression parameter = Expression.Parameter( typeof ( object ), "child" );

        MethodInfo methodInfo = typeof ( FrameworkElement ).GetMethod(
            "AddLogicalChild", BindingFlags.NonPublic | BindingFlags.Instance );
        MethodCallExpression method = Expression.Call( instance, methodInfo, parameter );

        Expression> lambda =
            Expression.Lambda>( method, instance, parameter );

        return lambda.Compile();
    }

    internal static void AddLogicalChild( this FrameworkElement element, object child )
    {
        AddLogicalChildMethod( element, child );
    }
}

What is WPF?


Often we see movies/TV Serious that use software application with extraordinary user interfaces. An example of such a TV serious would be CSI. The first time I saw an episode I was impressed with the software that these guys were using. Controls unfolding, three-dimensional pages spinning, wow these guys are lucky to have such software applications….

Well Guys hold on to your rotating chairs because finally we can do CSI-like UI’s thanks to Microsoft with the mighty WPF.

Windows Presentation Foundation aka Avolon is a major component of .Net Framework 3.0. This technology can be used in two different ways;

In code (like normal Widows Forms)
In XAML (pronounced zammel), HTML like code.

Before WPF one could compare a Designer-Developer relation to a Cat-Dog relation. Reason being the designer dreams of controls that are easy to design with tools as Photoshop yet for the developer to implement these controls, a lot of effort is required. WPF is the answer to every developer’s prayer. Designers now can dream, dream and dream since they will be building the user interface using tools such as Microsoft Expression to generate the XAML for us developers.

Enough with the talk; let’s do some action. We will build a normal button with both C# code and XAML.

C# Code

Button b = new Button();

b.Content = “Hello World”;

XAML

< button xmlns=”http://schemas.microsft.com/winfx/2006/xaml/presentation”>
Hello World < /button>

Both of the above code lines will emit the same output i.e. a normal button with the text Hello World. Now lets take this button up a level using one of WPF features; Control Templates.

<Window.Resources>

<ControlTemplate x:Key=“maltaDevButton“ TargetType=“{x:Type Button}“>

<Grid>

<Ellipse x:Name=“outerCircle“ Width=“100“ Height=“100“>

<Ellipse.Fill>

<LinearGradientBrush StartPoint=“0,0“ EndPoint=“0,1“>

<GradientStop Offset=“0“ Color=“Blue“/>

<GradientStop Offset=“1“ Color=“Red“/>

</LinearGradientBrush>

</Ellipse.Fill>

</Ellipse>

<Viewbox>

<ContentControl Margin=“10“ Content=“{TemplateBinding Content}“ />

</Viewbox>

</Grid>

<ControlTemplate.Triggers>

<Trigger Property=“IsMouseOver“ Value=“True“>

<Setter TargetName=“outerCircle“ Property=“Fill“ Value=“Orange“/>

</Trigger>

</ControlTemplate.Triggers>

</ControlTemplate>

</Window.Resources>

<Grid>

<Button Width=“100“ Height=“100“ FontSize=“10“ Template=“{StaticResource maltaDevButton}“Content=“Malta Dev“ />

</Grid>

Control templates are only one of the features that WPF offers. WPF offers a lot of other things such as

Data Binding
You can bind a control to a collection of data just like in normal windows forms yet with WPF if something in the control changes the UI will update automatically (This is available if the collection is ObservableCollection, or if the Collection being bound implements the INotifyCollectionChange or the INotifyPropertyChange)
Animations
You can have animations just like in Macromedia Flash
Rich Content support for all controls
Example: A drop down list that contains images as list items.
Smooth fonts
Since WPF uses vector graphics fonts are not effected when you resize the form.
You can also create you own fonts and embed them in your application as a resource
Full support for documents
Example: You can have a document in a form that flows respectively when the form is resized
Bitmap effects
You can have effects such as blur, shadow, reflection etc on controls.
Integrated video support
You can have a video playing in your form and overlay controls on the video.
Style an application
You can have a predefined style that sets all controls in the application (like CSS for HTML)

The image below is a screen shot of an application developed with WPF. You can download all source code of this application from wpf.netfx.com/files/default.aspx